Firmware Boot and Recovery
Abstract
- The layout and structure of firmware for Chromium OS is designed for security (see Verified Boot documentation), recovery and development.
- All firmware will contain a recovery code path, which will restore the machine to its original Chromium OS state. This recovery code path will be initiated either when any chain in the boot path is not verified or when a user manually triggers recovery mode, likely via an explicit recovery button on the device.
- Chromium OS wants to support developers as well. Developers are provided with a means of running alternate software. In the alternate boot paths, the user is notified that they are not running a boot path provided as part of Chromium OS.
- The boot and recovery procedures outlined will be implemented and required for all Chromium OS platforms regardless of architecture (ARM/Intel/etc...).
This document describes the firmware boot process, including detection and recovery of corrupted or hacked firmware/software.
Potential problems
The firmware boot process must be able to detect the following problems and, if possible, repair them.
Firmware
- Incomplete update: An update of the firmware is interrupted. This leaves the portion of the firmware which was being updated in an unknown or corrupt state. For example, if the update is interrupted after a firmware block is erased but before it is reprogrammed, that block is empty.
- Attack: An attacker compromises the software and is able to reprogram the firmware. For example, an exploit of an unpatched kernel vulnerability. In this case, both the main and backup firmware may be compromised.
- Corruption: The EEPROM holding the firmware becomes corrupted in the sectors containing writable/updatable firmware.
Software
- Incomplete update: An update of the software on the drive is interrupted. This leaves the rootfs partition in an unknown state.
- Attack: An attacker compromises the software and is able to rewrite the data on the drive (rootfs or partition table).
- Malicious user: A malicious user installs developer mode onto the device, leaving behind a trojan, then returns the device.
- Corruption: The drive becomes corrupted in the partition table or rootfs partition.
- Crash: Device crashes on boot due to bad software. For example, the device is updated with the wrong image. This prevents the normal autoupdate process from running.
Out of scope
The following problems are outside the scope of this document in its current form:
- An attacker with physical access to the device opens the device and
alters its innards. This includes:
- Jumpering the EEPROM to gain write access to the read-only portion.
- Replacing the EEPROM.
- Otherwise altering the circuit board (adding piggyback chips, etc).
- Exploits involving the normally-writable data partition.
- Changing bookmarks to point to sites which download HTML5 malware, etc.
- Malformed bookmarks file or image which causes a buffer overrun when parsed
- Changing the preferred wireless network to a malicious one which logs/alters packets
- Exploits involving other processors (embedded controller, modem processor, etc.)
Design decisions
Boot needs to start securely
In order to attempt a secure boot, the initial boot stub needs to perform a minimum level of initialization to verify the next piece of boot code before handing off to that code.
To prevent accidental or intentional corruption of the known-good boot stub, this code must be in a portion of memory which is not field-writable. Many EEPROM devices have an external pin (==WP==) which can be pulled low to write protect the upper portion of the EEPROM. This has a number of benefits:
- Devices are writable at time of manufacture (as opposed to true ROMs, which are fixed at time of ROM manufacture).
- Devices can be made writable for firmware development by simple hardware modification.
- Both readable and read-only ROM are provided by a single device. Simpler board design, fewer parts, lower cost.
- Any attacker who can open the case and modify the hardware to write to the protected upper portion of ROM could also simply replace a true ROM with a reprogrammed part, so this isn't significantly less secure than a true ROM.
On ARM platforms, the initial boot ROM may be in the same package as the processor. This is even more secure compared to a separate EEPROM.
Writable firmware should have a backup
To protect against a failed firmware update, the writable portion of the firmware (responsible for doing the remainder of chipset and storage setup and then bootstrapping the kernel off the storage device) should exist in two copies. In the event the first copy is corrupt, the device can boot normally off the second copy. This is similar to the design for the file system, which has two copies of the root partition.
Recovery firmware must be read-only
Recovery firmware must be able to take over the boot process if the boot stub determines that the normal writable firmware is corrupt, or if the user manually boots the device into recovery mode.
To prevent the recovery firmware from being corrupted by a firmware update or a software-based attack, it must be in the same read-only portion of the EEPROM as the boot stub.
Recovery firmware does not need to access the network
The recovery process should not require firmware-level network access by the device being recovered. The recovery procedure can involve a second computer, which is used to create recovery media (for example, a USB drive or SD card). It is assumed that second computer has network access.
This simplifies the recovery process, since the recovery firmware only needs to bring up enough of the system to bootstrap a Linux image from local storage. That image can then take care of reflashing the EEPROM and reimaging.
It is not necessary to implement a full network stack with WiFi configuration in the recovery firmware to support PXE boot. PXE boot introduces a number of complications:
- Need to initialize more hardware to bring up wireless, keyboard, etc.
- Need to implement a full network stack.
- Makes recovery an interactive process, including the user entering their SSID and WPA key, which the user may not know.
- Unlikely to work for public WiFi access points; these often redirect http access to a login screen, navigation of which which would necessitate a full browser in the recovery firmware.
- Unlikely to work for cellular networks (3G/4G/etc...), if that requires more complicated drivers or configuration.
All of these issues would need to be resolved, and the resulting firmware must be correct at the time the device ships, because recovery mode firmware can't be updated in the field. It is unacceptable to ship a mostly-working PXE solution, assuming that the user can fall back on a second computer in the event PXE recovery fails. The only time the user would discover PXE recovery didn't work is when the user is relying on it to repair their computer.
More information on wireless network boot is here: http://etherboot.org/wiki/wirelessboot.
Recovery firmware should tell the user how to recover
If the recovery firmware finds a USB drive/SD card with a good recovery image on it, it should boot it and use that to recover. The software in that recovery image will have its own user interface to guide the user through recovery.
If the recovery firmware does not find a good recovery image, it needs to tell the user how to use a second computer to build that recovery image.
The preferred way to do this is to initialize the screen and show recovery instructions to the user, including a URL to go to in that second computer's web browser. Note that recovery instructions need to be displayed in the correct language for the user.
It is desirable for the recovery instructions and/or recovery URL to include a code for the device model. This allows the destination website to:
- Provide the proper recovery image for that device model.
- Describe the recovery procedure specific to that device model. For example, if the device has a SD card but no USB port, the recovery procedure would indicate that a SD card is necessary, and would not discuss the possibility of recovering using USB.
- Display graphics appropriate for the device model. For example, showing the location of the USB or SD card port.
Users must be able to manually trigger recovery mode
If the writable firmware and/or rootfs have valid signatures but don't work (for example, the user somehow managed to get an ARM kernel on an x86 device), the user needs to be able to force recovery mode to run.
This can be done by having a physical reset button somewhere on the device. When this button is pressed during power-on, the device goes straight to the recovery firmware without even looking at the writable firmware or file system.
Some options for the recovery button:
- It could be a button attached to a GPIO on the main processor. In this case, the boot stub would initialize the GPIO and read its state at boot time.
- It could be a button attached to a subprocessor such as the Embedded Controller (EC). In this case, the boot stub would need to request the button state from the EC at boot time.
- It could be one of the keys on the keyboard, though this creates the
undesirable possibility of accidentally entering recovery mode.
- This is undesirable if the only interface to the keyboard is USB, because USB firmware is more complex and the USB hardware interface can take a significant amount of time to initialize.
- Some devices use a subprocessor to read the keyboard. In this case, initiating recovery mode is much like the previous option.
- The keyboard could bring out the press-state of one of its keys to a separate I/O line, which could be attached to a GPIO on the processor or to a subprocessor.
Since the recoverability of Chromium OS is one of its key features, we seek to have a dedicated "recovery mode" button.
Support developers / l33t users installing their own software
To provide a relatively trustable boot for the majority of users, we need to control all the read-only firmware at the beginning of the boot process.
To support developers, at some point during the boot process, we need to hand off to code self-signed by someone else.
The initial devices will allow hand off at the point the kernel is loaded and its embedded signature is checked. This can produce one of three results:
- Trusted kernel: The kernel has a valid signature, and the signing key is known to the firmware. This is the normal case for production devices.
- Developer kernel: The kernel has a valid signature, but the key used to sign the kernel is not known to the firmware. This is the case when a developer builds and self-signs their own kernel.
- Corrupt kernel: The kernel fails its signature check.
Once the chain of trust departs from the standard Chromium OS boot chain, we need to indicate this clearly to the user of the device. This prevents malicious attackers from giving users a modified version of Chromium OS without the user knowing. We likely will need to show a warning screen which includes the following elements:
- A warning that the standard image of Chromium OS is not running
- A means of reverting back to the standard Chromium OS image
- A means of allowing the user/developer to proceed down the "untrusted" path
It is desirable for the warning screen to have a timeout, so that Chromium OS devices with developer images can be used in unattended applications (for example, as a media server). The timeout should be sufficiently long that a user can read and respond to it - for example, at least 30 seconds.
Since language settings will not be available at this stage of the boot process, any messaging will likely need to be internationalized and displayed in all possible languages.
EEPROM map
Here is an early guess at sizes and layout of the EEPROM. These sizes may change as we progress with implementation.

Firmware block descriptions
Boot stub
Must be at the top of EEPROM, since most processors jump to the top of memory (0xFFFFFFF0) after internal initialization.
Contains the "root key" - the official public key used to verify the signature of the next stage of firmware. The private key is not contained on the device, and must be protected from all unauthorized access. To reduce exposure of the private root key, the private root key will be used to sign a second date-limited or numbered key stored in the rewritable firmware, which is then used to sign that firmware. Validation of the date or key number could be done via a TPM module.
Pseudocode
- Initialize processor and RAM (and implicitly, those parts of the north bridge necessary to initialize RAM), using conservative timings.
- If user-forced recovery mode, skip to attempt loading recovery firmware. (The recovery button asserts an I/O line that can be measured by the firmware.)
- Check the non-volatile register or memory region for a recovery mode cookie value. If this is set, some later stage of the boot process must have failed and requested recovery mode, so skip to attempt loading recovery firmware.
- Attempt loading Firmware A.
- Copy Firmware A to RAM.
- Verify signature of Firmware A using public key stored in boot stub.
- If signature is valid, jump to Firmware A Setup.
- Firmware A is bad. Repeat for Firmware B.
- Both A and B are bad. Attempt loading recovery firmware to RAM and verify signature. If valid, jump to recovery firmware.
- All recovery options have been exhausted. Catch fire / emit POST code / etc.
Firmware (A/B) setup
This firmware sets up a minimal set of hardware components so that the boot loader can load the kernel from the normal boot drive. For example, the SATA or eMMC controller.
Pseudocode
- Initialize chipset / file system sufficiently to jump to Boot Loader code.
- Jump to Boot Loader code.
Firmware (A/B) boot loader
The boot loader is only designed to load Chromium OS. We can go directly from firmware bootstrap to the kernel in the disk.
Pseudocode
- Verify the partition table on the disk looks sane.
- Load kernel A from the disk.
- Verify signature of kernel.
- If signature is invalid:
- If this is kernel A, retry with kernel B.
- Else this is kernel B. Both kernels are bad, so set the recovery-mode cookie non-volatile register and reboot into recovery firmware.
- If kernel was signed with a public key not known to the boot
loader, this is a developer kernel:
- Initialize the display.
- Display scary developer mode warning to user. For example: "Google Chrome OS is not installed. Press space bar to repair."
- Wait for keypress or 30-second delay before continuing.
- If key pressed was Space bar, Enter, or Esc, jump to Recovery Firmware.
- If key pressed was Control+D, dismiss screen.
- Ignore other key presses.
- Continue booting the kernel.
Boot log
A boot log will be stored at the bottom of the writable section of firmware. This will store the following types of events:
- Each time recovery firmware is run, with information on what triggered it (manual, bad firmware, bad root filesystem, etc.).
- When a recovery completes, including which actions were taken.
It does not store information on successful boots. This removes the need to support EEPROM writing in the normal boot process, and conserves space for log entries dealing with real errors.
The boot log can be uploaded as part of the autoupdate process. It can then be cleared and reused for new log entries.
Recovery firmware
This firmware attempts to recover from bad firmware or rootfs by loading a recovery image off an external storage device.
Pseudocode
- Write a log entry to the boot log indicating why recovery mode was activated (manual, bad writable firmware, user triggers recovery mode, etc.)
- Initialize enough of the chipset to be able to access a storage device (USB drive, SD card, etc.)
- Check for an inserted storage device. If no storage device is present, skip to displaying recovery instructions.
- Verify the signature of the recovery image, using a public key stored in the recovery firmware. If the signature is invalid, skip to displaying recovery instructions.
- Load and run the recovery image.
- If we're still here, either no storage device was inserted, or the
storage device did not contain a valid image. Display recovery
instructions:
- Initialize the display.
- Display instructions. These instructions must be
internationalized and rendered in multiple languages. The
instructions must include:
- A warning that the computer is in recovery mode
- How to obtain a trusted recovery image (for example, instructions to go to a second computer and browse to a specified URL for further instructions)
- An indication if an already-inserted storage device does not contain a valid recovery image (sorry, try again).
- Wait for a storage device to be inserted, then go back to step 3.
Most of the recovery work is left to the recovery image loaded from the storage device. This allows for publishing updated recovery images and instructions. Because the recovery firmware is etched in stone (well, as electrons in floating gates) at the time the device is launched, it needs to be as simple and robust as possible.
Recovery image
This is the software loaded onto a storage device (USB drive, SD card, etc.) which does the bulk of the recovery work.
The recovery image will be available for download.
We will need to provide a downloadable installer for users to use to install the recovery image on the storage device. This installer should be supplied for all popular operating systems (Chromium OS, Windows, Mac OS X, Ubuntu Linux). The installer will:
- Prompt the user to select a destination for the recovery image
- Ideally, the user will only be able to select destination devices appropriate for recovery of the laptop model they are attempting to recover.
- Also, the user should only be able to select removable devices. We don't want them trashing their hard disk.
- Warn the user that this will erase whatever is on that destination, and prompt for confirmation
- Reformat the destination storage device
- Install the recovery image on the storage device
- Prompt the user to insert the storage device into the Chromium OS device
Ideally, the installer would be able to back up the current data on the destination device, before reformatting and writing the recovery image. When recovery is complete, the user could re-insert the destination device and have the original contents restored.
The recovery image should contain an entire clean copy of the firmware and rootfs. This way, a user can make a recovery device ahead of time. For example, if a user is going to be somewhere with poor connectivity, they could make a recovery USB drive at home and keep it in their bag. Alternately, the system could come with a recovery device (though users might end up reformatting it and filling it with images of kittens).
The recovery image on the storage device would do something like the following:
- Initialize the display and tell the user what's going on. Reassure them that their Chromium OS system is trying to recover.
- If developer firmware is detected, give the user a choice of "JUST
FIX IT" or "Scary Settings for L33t H4x0rs". If the user picks the
latter:
- Give the developer more control over each stage in the rest of the recovery.
- For example, a developer might not want to wipe and replace rootfs or stateful data, or might want to make a backup of that data.
- Run system tests. It's possible that the boot problems are due to
bad hardware. Now's the time to detect that.
- If hardware is sufficiently bad that the rest of recovery can't be run, show the user information on how to return it.
- Verify both firmware A and firmware B are up-to-date and valid. Load known good firmware as needed.
- Verify rootfs-A and rootfs-B are up-to-date and valid. Load known good rootfs images as needed.
- Wipe the stateful data. Anything the user cares about should be in
the cloud anyway. If the user's been hacked, wiping the data will
put the device back in a known good state.
- Optionally, it can inform the user that data on the system will be erased.
- This message should emphasize that most data is saved to the cloud, so that the user is more likely to proceed with recovery.
- It is less desirable to give the user a choice whether or not to delete the stateful data. Most users would pick the less scary but also less secure option of NOT deleting data - but this leaves them vulnerable to persistent hacks on the data partition, such as manipulating their /etc/hosts file or bookmarks.
- If recovery mode was manually triggered, ask the user why they're
running it.
- Couldn't even log in; crash during boot
- Kept crashing after boot
- Worried my system was hacked
- Hey, what's this button do?
- Write an entry to the boot log describing repairs performed.
Recovery via Chromium OS
The recovery installer should run on a healthy Chromium OS system. That is, it should be able to download the recovery image, reformat the storage device, and copy the recovery image to it.
- This enables a healthy Chromium OS system to create its own recovery
device in advance.
- Perhaps we should periodically advise users to update their recovery device?
- It also enables one Chromium OS system to download a recovery image for a different model. (A user has a corrupt system, so they go to their friend's house and use the friend's Chromium OS system to make a recovery image).
Making recovery images read-only
If the recovery image is inserted into a powered-on and hacked system, the hacked software could delete or corrupt it. This won't cause the recovery firmware to load that corrupt image, because the corrupt image will fail the signature check. It will be annoying to the user, who will need to reflash the storage device.
This is more of an issue if we want to include an internal recovery image (for example, on an internal storage device).
The SD standard specifies a physical write-protect notch for SD cards, similar to those on a 3.5" floppy disk. Unfortunately, the implementation of the write-protection is purely software, so pwned drivers can choose to ignore the write-protect detect signal.
Some USB drives have a write-protect switch on them. In this case, the protection is handled by the USB drive itself.
Some eMMC chips have a number of protection mechanisms including:
- an external LOCK# pin which can be used to make the device read-only
- a write-once bit which makes the device read-only until reboot
Since these chips come in sizes up to 2GB (~$10 at stores), they provide a possible place to store a recovery image. Some system architectures may be able to use the eMMC drive to hold the main firmware image also.
If we have an internal storage device, it's possible we could wire it so it's only enabled if the recovery button is pressed at boot time. For example, we could use that button to latch up a circuit which powers that device, so that it will remain powered during that boot only.
Using recovery mode to load developer mode firmware/software
If the rootfs image on the SD card is signed by someone else, the recovery image will display a screen similar to the Developer Mode screen. Instructions on this screen should include:
- Notice that the recovery image is signed by someone else
- How to obtain a trusted recovery mode image
- Instructions on installing a trusted recovery image
- A means of allowing the user/developer to proceed down the "untrusted" path
Note that this screen must also be internationalized / rendered in multiple languages. This is potentially much easier, since by the time we're doing this the recovery image has booted a full OS with GUI.
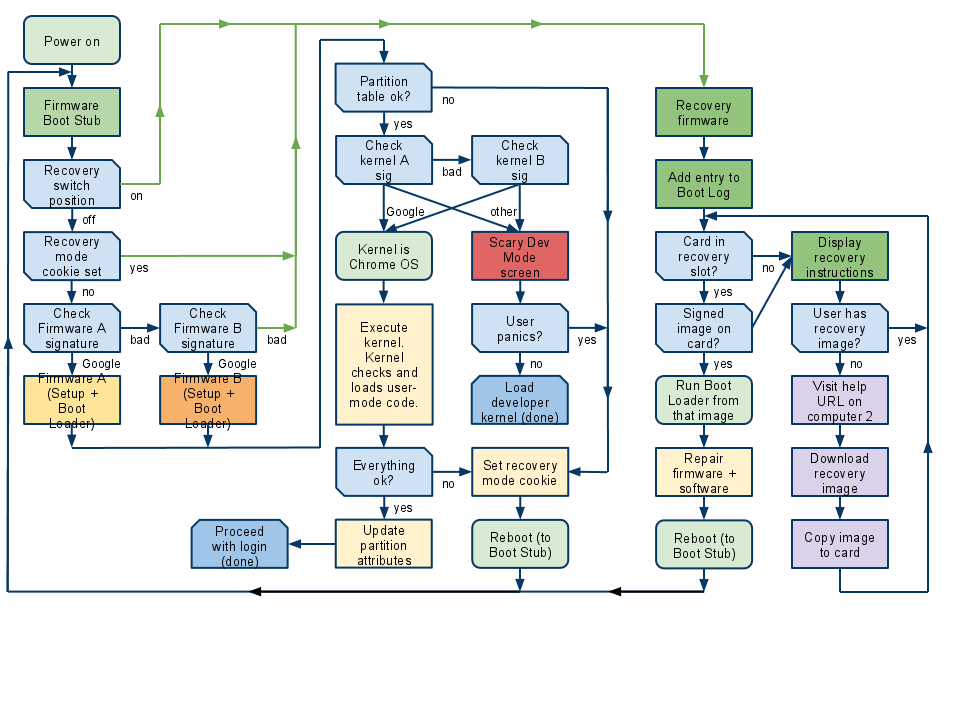
Boot flowchart
The three main downward flows in this chart show:
- Start of boot in read-only firmware
- Normal continuation of boot, loading kernel from internal drive
- Recovery mode
Other notes
Verification of the rest of the rootfs
The firmware boot process above describes a way to verify all code from the start of boot through hand off to the kernel.
The kernel is responsible for verifying the rest of the data in the rootfs - for example, user-mode drivers. If the kernel determines that the rootfs has been compromised, it can force recovery mode to run by setting the recovery mode cookie in a non-volatile register and rebooting into recovery mode.
Alternately, a kernel which determines its rootfs is corrupt can commit suicide by marking its partition as inactive and then rebooting. The next boot will do one of the following:
- If the other root partition is good, the boot loader will run the other root partition.
- If neither root partition is good, the boot loader will trigger the recovery mode firmware, which can put the rootfs back in a known state.
When to verify the boot process
We should develop under the initial assumption that we can verify every boot, since this provides the most security.
Signature-checking code does impact startup time. However, this is likely not an issue for the firmware (< 1 MB) and kernel (< 10 MB) than it is for the remainder of the rootfs. We assume that we will verify the entire firmware and kernel every boot.
Handling returned systems
When a Chromium OS system is returned to the store, the store should check to make sure it still boots.
- If it boots normally, the store can follow their standard process for dealing with returns.
- If it displays the Scary Dev Mode screen, the store can either run recovery mode or refuse the return (in which case the original owner can go home and run recovery mode, then come back and returns the system again).
- If it fails to boot, it gets shipped back to the manufacturer.
Note that it's advisable for stores to run recovery mode on returned computers anyway, to put them back into a clean state and destroy any user data still on the device.
Testing
The comprehensive test suite for Chromium OS should include tests of each stage of the verification process and the recovery procedure, including all decision points in the pseudocode/flowchart. This will require actual hardware for each firmware image being tested.
Testing should also attempt to write to the read-only portion of the EEPROM, to ensure that it is in fact not writable.
Open issues
What else do we need to verify?
This document describes verifying the following:
- Firmware in the main EEPROM
- Partition table
- The kernel partition
It explicitly does not discuss verifying:
- The rootfs (anything after the hand off to the kernel)
- The stateful data partition
Are there other locations for persistent storage we should be verifying? For example:
- Firmware in other components?
- File system
- NIC
- 3G modem
- Embedded controller
- Modem processor (on ARM systems)
- Keyboard (this apparently is an attack surface on some systems)
- (we disallow option ROMs in the hardware spec, so we don't need to worry about those)
- Removable user media
Can we log firmware crashes?
- Crashes in boot stub (i.e., north bridge / RAM init) likely aren't loggable at all. Not enough of the system is running.
- Other crashes in the firmware could write a cookie into a particular
address in SDRAM.
- When the system boots next, it could check that address for a valid crash cookie.
- If so, assume the current firmware is bad; try the backup firmware, or go to recovery mode.
- Downside: Intermittent crashes which would be mildly annoying now prevent the system from attempting to boot at all, since it would tend to go into recovery mode.
- Crashes in the kernel can be logged to the stateful partition.
Chain of verification on ARM?
Some ARM SOCs contain a modem processor and an application processor. On boot, only the modem processor is running; its firmware then sets up and starts the application processor. If the modem firmware is writable, we could be hacked before the first instruction of our firmware executes. We need a way to secure the modem firmware. (This is true regardless of the boot order, if the modem firmware has access to the registers or RAM used by the application processor).
Such systems could use a Memory Protection Unit or similar such hardware solution, to prevent the modem and application processors from reading/writing each other's firmware or memory space, except for specific portions of the memory space used for inter-processor communication. We are still investigating what solutions can be used for verified boot.
Support for Trusted Platform Module (TPM)?
A TPM is not required for key verification for the firmware boot and recovery process described in this document. There's no point in the verification key being more secure than the code in ROM used to do the verification. If an attacker can crack the ROM code, they can just make it bypass the TPM check.
If the boot stub contains a secondary key which is date-limited, it is desirable to use the TPM to verify the date-limited key is valid. Many TPM modules contain their own clock/counter, so can be used to defend against turn-back-the-clock attacks. Similarly, if we use numbered or sequential secondary keys, storing the highest-seen key number in the TPM can protect against rollback attacks.
There may be some firmware requirements to set up the TPM so that subsequent activities (3G authentication, etc.) can get access to the keys stored in the TPM.